I was a boy when I received my first pair of snowshoes, a wood-framed, rawhide-laced (the rawhide was traditionally made from moose hide and known as babiche, pronounced “bab-eesh”) pair made in Maine that took me on countless boyhood journeys through the winter woods. Since then, I’ve snowshoed all over Maine, New Hampshire, New Brunswick, Quebec and Alaska. A few years ago I did a rough estimation of how far I’ve walked on snowshoes, and it was more than a few thousand miles.
The aboriginal people of Europe and Asia developed skis for moving on deep snow. In North America, they developed snowshoes. Both are ways to walk on deep snow and not sink. They function by spreading your weight across a larger surface area of snow, allowing you to walk on top of the snow instead of “post holing”, or sinking down to the ground with each step. This saves energy and allows you to move much faster. The bigger the frame and the tighter the weave, the more flotation it provides. In waist-deep snow, covering 50 meters with no snowshoes has taken me more than ten minutes; wearing snowshoes, I walked right across it like I was walking down a sidewalk.
Snowshoe Design
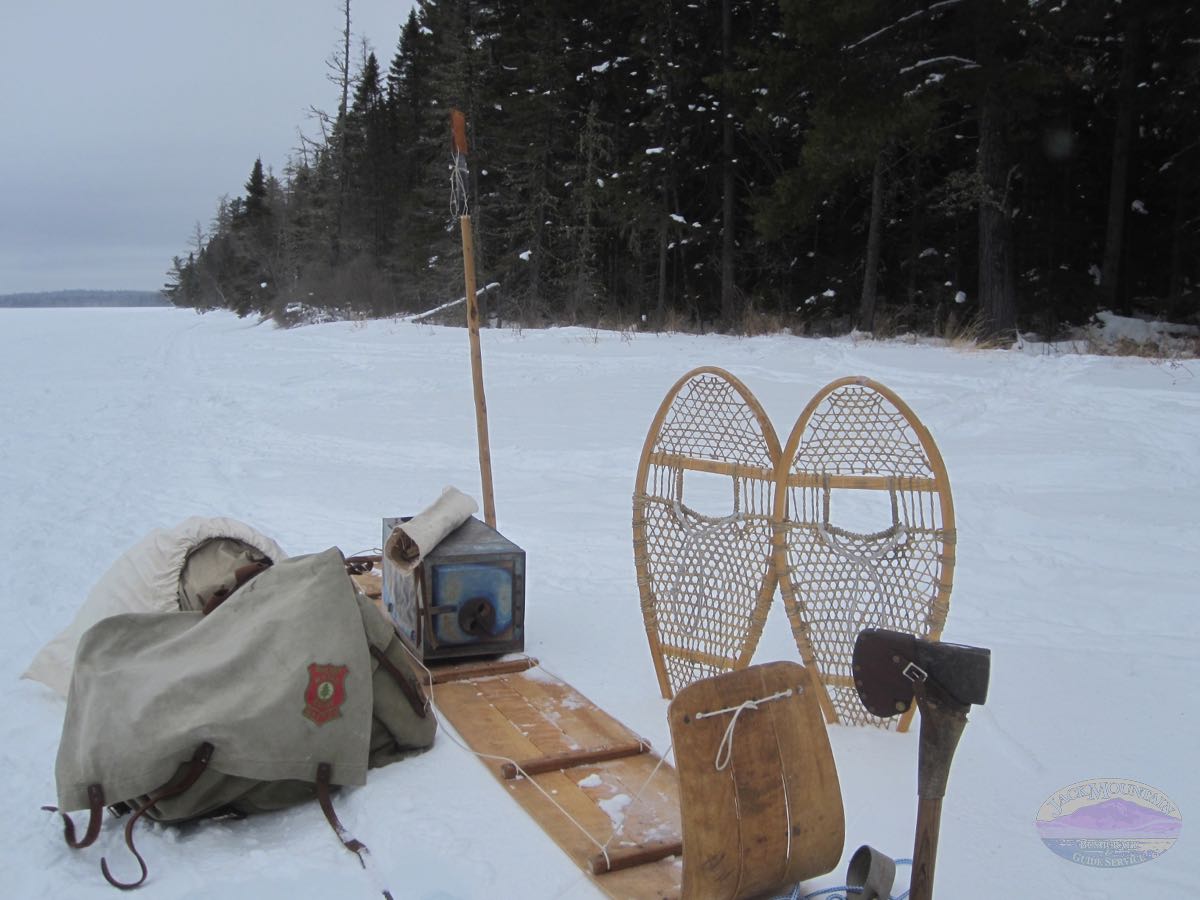
Despite our modern homogenization of outdoor gear (ie. the greatest knife for all environments!), snowshoes size and shape evolved with distinct regional differences. In open areas with deep, dry snow and few trees such as Alaska, the shoe that developed was long and narrow. On the other end of North America in northern Quebec, where the snow is deep and the bush is thick, a short, rounded shoe was developed. The important point is that the land and the local snow conditions influenced the size and shape.
Two Pairs
The weather is never static, and as a result there isn’t one perfect pair for any location. The large-framed, finely-woven shoes needed for the deep, dry snow of midwinter wouldn’t last long in the icy, sharp-edged conditions of the shoulder seasons. A smaller, more coarsely-woven pair was kept for such conditions. These late-season conditions are also when an improvised pair such as Kochanski’s ski shoe perform their best.
Keeping a second pair handy isn’t just for the shoulder season. My Cree friends of northern Quebec bring two pairs even in the dry snows of midwinter. The first pair is for covering distances on the trail. They’re longer and narrower. The second pair is for maneuvering in thick bush. They’re shorter and rounder. As with all aspects of outdoor gear, there isn’t that one perfect pair that will do it all.

Choosing Your First Pair Of Snowshoes
If you’ve never used snowshoes before, the choices can be bewildering. But there’s a simple piece of advice I give to people coming on our winter trips. Get the biggest pair you can walk in without having to walk bowlegged. If they are of the short and wide variety, you’ll have to take longer than normal steps. When the snowshoe is the right size and the bindings are well-adjusted, you should forget you’re wearing it when walking straight ahead. There can be a slight extension of the forward stride, but ideally you walk with a normal gait, toes forward. There is a painful condition the voyageurs referred to as “Mal de raquette”, which is a straining of the muscles and tendons of the legs as a result of walking bowlegged. I’ve read about it, but thankfully never had it, but I’m told it’s quite painful. Avoid getting it by walking normally.
Axe Or Tapping Stick
Snow will accumulate on the top of the lacing. In a perfect world, the spacing of the weave would allow it to fall through so you’re never lifting the extra snow when you lift your foot. I’ve heard a lot about this perfect world and would like to visit there sometime, but where I’m at snow builds up on top of the shoe. In heavy snow, it adds significant weight to each step. I like to carry my axe or similarly sized stick in my hand to tap the side of the frame, which knocks off most of the snow. In cold, dry snow, I will tap whenever snow starts to build. In wet, heavy snow, I tap much more frequently. I also use the stick to push down on the toes of my snowshoes if I want to back up. Lastly, it’s useful for knocking the snow off of evergreen branches before I walk under them, keeping the snow off of my clothing.
Snowshoe Technique
Unlike skiing, where you can be refining your technique years after you begin, with snowshoeing the vast majority of the techniques are learned in the first few hours. Walking forward in a straight line is simple. If you put them on and try it, you’ll get it quickly. You may fall a few times, but most people pick it up within a few minutes. However, there are four points on technique that aren’t so intuitive.
First on this list is turning. This is where the majority of the falls occur because you can’t simply turn like when you’re walking. To turn with a wide radius, take a series of shuffling baby steps where your snowshoes never travel over one another. Lead with the foot in the direction you want to turn, and the other foot follows. Turning with a tight radius is more of a challenge. Lift up one shoe and rotate it 180 degrees in the air. When you place it down, your feet are roughly parallel, but your toes are facing in opposite directions and you resemble a sort of backwoods ballerina. When your foot is firmly planted, lift up the other foot and swing it around.
Second is backing up. Snowshoes don’t have a reverse, at least not when using traditional bindings. Because they’re weighted so that the back end is heavier, when you try to back up the rear of the snowshoe buries itself in the snow. There are two ways to deal with this. The first I already mentioned; carry a stick and push down on the toe of the shoe while backing up. The other way is to lift the shoe clear of the snow, then flex your hamstring and ankle at the same time to flip the tail up. While it’s flipping up, take a quick step backward. It takes some practice, but not that much.
Third is getting up after you fall. If the snow is deep and powdery, it can be very difficult to get back on your feet after you’ve fallen. It’s also a challenge if you’ve fallen backwards. A solution is to roll until you’re on your stomach, then get your shoes under you before trying to stand. Sometimes this will require you to take off the shoes in order to use them as a platform. This is another instance where carrying a stick can be helpful.
Lastly is something few people think of before hitting the trail; how to poop with your snowshoes on. The goal is to take care of your body’s needs without bringing any of it back to camp. First, pack down a small area so that the deep snow doesn’t touch you in unwanted places. Before attending to your duty, point the toes of your snowshoes together and widely splay the tails. If you’re unable to perform such functions in a squat, take the shoes off and stand on one while holding onto a tree. I don’t want to go into too much detail here, but there have been many occasions where people have brought unwanted evidence back into camp, frozen to the tail of their snowshoe. Don’t let it happen to you!
Snowshoe Bindings
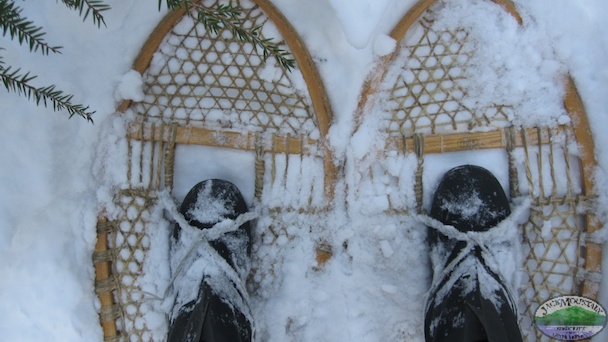
Bindings need to hold your toe securely to the shoe and wrap around your heel to keep the shoe from coming off, while at the same time allowing your heel to move. This single pivot design is common to all bindings. Modern bindings are made of rigid materials and fasteners that require your hands to open and close. Traditional bindings, as I define them are flexible and non-rigid, and are thus easily made of of a variety of materials. I’ve always used a traditional binding because that’s what I find the most versatile and comfortable. That they are simple and homemade is just a bonus. On a cold day when those with modern bindings are bending over and taking off their mitts, I can take off and put on my snowshoes with no hands and a turn of the ankle. And I’m not even a magician!
There’s a statistic I’ve heard that 50 people in North America die each year as a result of such modern bindings; mostly ice fisherman whose feet go through the ice, but are unable to get their hands down to release their snowshoe. I don’t know where it comes from or if it’s true, but it makes sense.
Old books on snowshoeing describe native bindings as made out of a thong of braintanned moose hide (buckskin). Traditional woodcraft books describe them made from cotton lamp wick. I’ve tried both of these, but my preference is for nylon cord, reverse wrapped to the proper thickness so it doesn’t chew through my boots. The reason I opt for the nylon is that it doesn’t absorb water like the cotton or buckskin. When you’re on an extended trip and you get spell of weather near or above freezing, cotton or buckskin absorb moisture. When it gets cold again, they freeze solid, making it very difficult to adjust the binding if you want to change from mukluks to rubber boots. The nylon, even when frozen, can usually be thawed by grasping it tightly in your hand for a few seconds. If that doesn’t do it, a few minutes by the wood stove or fire and it’s dry enough to manipulate. In my experience, it takes much, much longer to dry both lamp wick or buckskin. Traditional snowshoe bindings are low tech and can be made out of anything. For several years in the mid 1990’s, my bindings were made from a section of 20 year old water ski rope. Use what you’ve got.
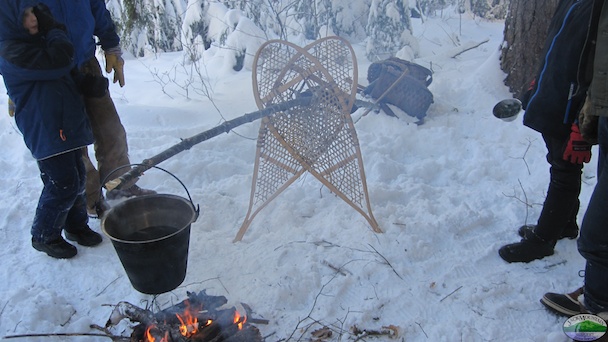
Other Uses For Snowshoes
In addition to walking on them, I’ve used snowshoes as a snow shovel, chair, back rest and pot suspension system. Some have even used them as a trap to catch small birds (I haven’t, I enjoy their cheerful company too much). Improvised snowshoes can even be used as part of a mattress. And there are probably at least 1000 other ways they’ve been used throughout history.
We like to think that technological advances are intuitive, and that we’d figure them out on our own were we to be somehow transported back in time before they were the norm. It’s part of our hubris as a culture. But shrouded in the mists of prehistory there was that first person to make a pair of functional snowshoes, put them on, and walk on top of the snow. Now all these years later we’re still doing it. They, and all who came after and refined the craft deserve our gratitude. Snowshoeing has added immensely to my enjoyment of the natural world. Both exploring the local woods, and on remote expeditions, it is the gateway to a world of winter wonder that can’t be explained, only experienced.
Note: Originally published in a magazine in 2014, reposted in 2024.


Comments on this entry are closed.
Great article Tim! Thanks for sharing your knowledge.
Thanks Chris.
Really great article. I use traditional snowshoes with lampwick bindings, and they seem to work ok, but I am really interested to hear more about the ” nylon cord, reverse wrapped to the proper thickness so it doesn’t chew through my boots.” The picture below it looks more like lampwick, and I can’t figure out quite what you mean by “reverse wrapped”. Any when you say nylon cord, I am thinking paracord. Is that correct? I can vouch that lampwick freezes.
The cord in the picture is thin nylon, although a bit thicker than paracord. By reverse wrapping, I mean I doubled it up on itself so it was twice as thick in order to keep it from abrading through my boots or mukluks. Imagine if you used a thin piece of wire – it would wear through rubber boots in a day. I picked up a spool of thicker nylon rope last year and we made a bunch of bindings for the participants on our Boreal Snowshoe Expedition. It worked great. I like the nylon because it doesn’t absorb much water. Thanks for the comment.
Excellent article Tim. Always a pleasure reading your work!
Thanks Derek. Looking forward to getting together.